Fax over IP in YourSipCloud
- by Qupra Wholesale B.V.
- in YourSipCloud
- on August 13, 2021
Although people may think that faxing is outdated, faxing is still a common way of sending messages. Many companies still use the fax on a daily basis. Faxing is also possible in YourSipCloud. YourSipCloud has Fax over IP (FoIP). This way you can receive and send faxes without the need for a fax machine. Within YourSipCloud there are three ways to send faxes online: Web2Fax, Fax2Mail and Mail2Fax.
Install Fax over IP
FoIP is not standard in YourSipCloud, it must be installed separately. To install FoIP, click on “Administrator Admin” at the top right and then on “Get addons”. Click on “Enterprise” on the left and press “Install” at FoIP.
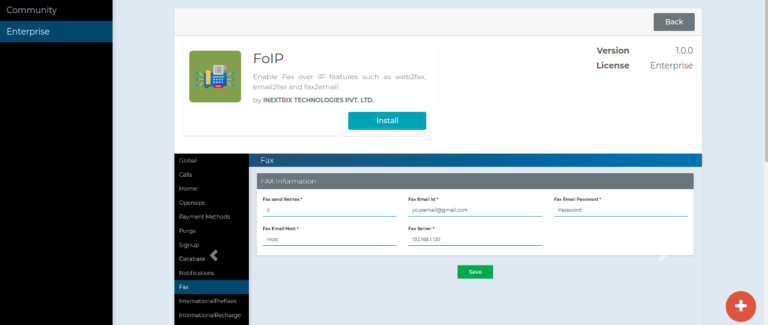
Go to “Configuration”, “Settings” en click on “Fax” on the left side to set up a new fax.
Web2Fax
With the Web2Fax function it is possible to send the fax in different formats from the web portal. Go to “Configuration”, “APFaxer”, “Faxer” and press “Create”.
Select the device to be used to send faxes. The system uses the selected caller ID and extension name to send the fax. Also enter the Fax number to which the fax is to be sent.
It is possible to send two types of faxes: Text and File.
Text: Allows you to write your fax content in the text field and the system will convert that text to PDF and send it as a fax.
File: Upload a file in various formats, such as pdf, tiff, doc or docx, and the system sends it as a fax.
Fax2Mail
The Fax2Mail function makes it possible to receive a normal fax and get it in the mailbox as a PDF file. To set this up, go to “Inbound”, “DIDs” and press “Forwarding”.
Set Call Type to “FOIP” to receive a fax. Enter the e-mail address where the faxes should arrive at “Destination”. It is not possible to enter more than one email address.
Mail2Fax
With the Mail2Fax function it is possible to send e-mails that reach the recipient as a fax. Configure the fax mailbox information from which emails can be sent and the system sends it as a fax.
To set this up, go to “Configuration”, “Settings” and press “Fax”. In “Fax send Retries”, set how many times an e-mail can be resent before the system shows it as a send error. Indicate at “Fax Email Id” from which e-mail address all e-mails should be sent as faxes, for example fax@……..com. Also enter the password and hostname for this email address. Finally, enter the Fax Server IP.
To send a fax by e-mail, enter the fax number to which the fax should be sent as subject when sending an e-mail. It is important that this e-mail is sent from the e-mail address indicated earlier, such as fax@……com.
Become YourSipCloud reseller-partner
Are you also interested in YourSipCloud and want to sell it to your customers? Then become a reseller-partner of YourSipCloud at Qupra. Call Alex on 088-8000879 or click here. At Qupra you get 15 lifetime PBX licenses for free as an introduction.