To be able to use a new SIP device, you must first create a SIP account in YourSipCloud and then set it up with the VoIP provider.
Create a SIP account
Creating SIP accounts is very easy. Go to “Account”, “Customers” and choose “SIP Devices”. Here are all SIP accounts. Press “Create” to create new SIP accounts.
You can now enter the details of the new SIP Account here. Here you will also find the options to set up a Voicemail for this device. Always enter the desired sender number at Caller Number. This is the number to call out. Then press “Save” to create the SIP account.
Configure a SIP account
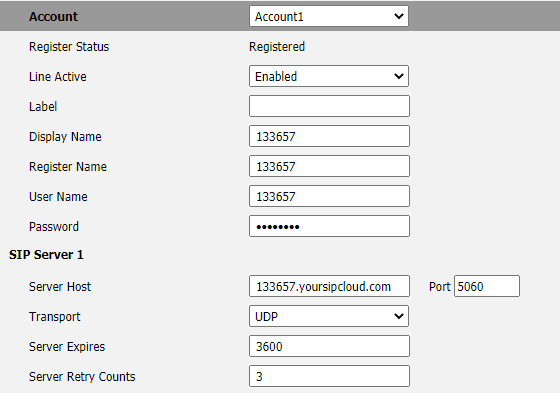
The best way to set up SIP accounts is to log in via a PC to the IP address of the device. Navigate to the IP address through your browser. Now a login screen will appear. The correct login details can be requested from the VoIP provider.
Display/Register name: The name that will appear in the device.
Username: The username from the SIP license at YourSipCloud
Password: The password from the SIP license at YourSipCloud
Server host: the customer’s provisioning domain (this can be found under SIP devices)
When you have entered all the data, click on “Confirm” at the bottom to confirm and save all data.
The account is now registered with your VoIP provider. When you see “registered” at the top of the page, it means that the registration was successful and you can call.
Become YourSipCloud reseller-partner
Do you also want to sell YourSipCloud to your customers? Then become a YourSipCloud reseller-partner at Qupra. Contact Alex at +31 88-8000879 or click here. At Qupra you get 15 lifetime PBX licenses for free as an introduction.